This best practice will walk you through how to add items to your admin.
When numbering items it's our best practice to start at 100 or above to utilize Clickbids auto indexing of item numbers. When selecting a starting item number series, the auto indexing will index from the lowest number greater than 100. The use of items below 100 is acceptable but auto indexing will not occur and will need to be manually entered.
1) Individually Add Items
Items > Manage Items > Add Item

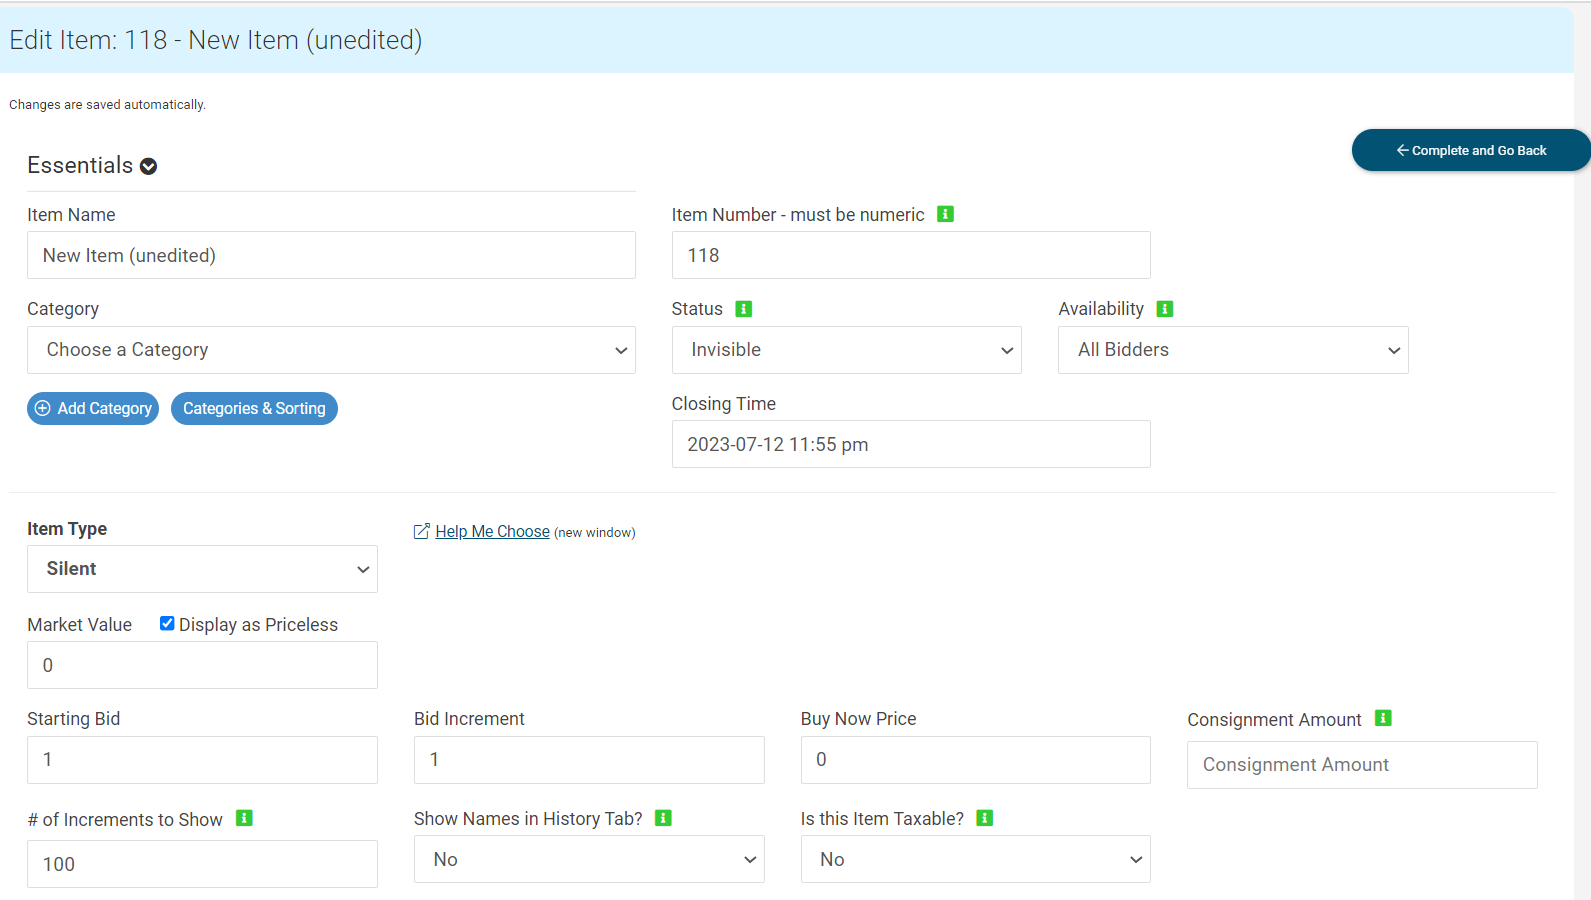
|
Important Settings: Status: Active - If auction open, items are biddable. If auction is closed, items are reviewable from the auction preview. Closed - Preview only from bidding site or auction preview. Invisible - Completely hidden from bidding site and auction preview. Closing Time: The exact time your item's will close. The status will switch from active to closed and a winning bidder is chosen and available to checkout for the item. Under Description & Extras, add the description or exception to your item. 
Under Donor Information, if you have an individual that donated this item and would like to add within the software, press the add donor button. This area works as a spreadsheet to easily add information. You can click the tab button on your keyboard to switch from fields. 
Have 2 donors on 1 item? You can easily update the display order of your donors by clicking and holding down on the 3 lines to the left of the Donor Name. Click and drag to the order you want your donors displayed.  |
2) Mass Upload Items
Items > Manage Items > Scroll down to Import Items > Download Template 
The software only reads this SPECIFIC excel spreadsheet. Not all columns have to be filled out but some (item name, item number, description, and start) column headers are required to be shown for upload.
NOTE: The template will only allow you to add 1 donor per item. If you wish to add more than 1 donor per item, you will need to add the 2+ donor information manually in the admin under the item, or manage donors.
Add the following information on the template:
|
Explanation of Columns on the Spreadsheet A. Name: Name of Item *required for upload* B. Number: Item Number C: Category: Category for your item. Ex: Electronics, Sports, Beauty. D. Description: Description of your item. E. Exceptions: Exceptions include black-out dates, expirations, and requirements. F. Table: Table that the physical item can be found at your event. G. Solicitor: Individual who has taken responsibility for the origin/donation/resource of that item. H. Solicitor Phone: phone number from the solicitor I. Solicitor Email: email address of the solicitor. J. FMV: Fair Market Value of the item/package. K. Start: Starting Price of Item (if applicable) L. Raise: Raise price or Increment of the item (if applicable) M. Closing: Closing time of the item. N. Taxable: Should this item be taxed? Yes or No. O. Tax Rate: Tax Rate if this item should be charged tax. P. Type: The type of item Ex: Silent, Live, Donation, Quantity, Blind, Credit or Info. Q. Buy Now Price: Buy now price is typically over market value (FMV), usually 150-200%. If s guest does not want to get into a bidding war they would have the option to buy it outright if you use this feature on some or all items. R. Notes: These are notes for you. The bidders will not be able to see these. They will appear on the spreadsheet found under Items > Manage Items, the Admin Viewable Notes section under Items > Manage Items > Descriptions and Extras, as well as the Archives CSV. S. Qty: This file is used with a Quantity Item Type only and is the quantity available. Selling 100 raffle tickets? Add 100 here to have the system only sell 100. T. Limited: This column is used with a Quantity Item Type only. Enter Yes, if you have a limited number available and No if you have an unlimited amount available. U. Consignment: The consignment amount is the amount that needs to be paid to the donor. This can be entered as a whole dollar or percentage. EX: 200 or .50 (for 50%). V. Tags: These tags will be displayed on the item for easily filtering and reporting. W. Donor Name: Must be added through the admin, not the template. This information is pulled into thank you cards found under the items tab. To set up multiple donors, go to Items > Manage Items > Donor Information. X. Donor Display Name: Only the Donor Display Name is shown to your guests on the mobile bidding site. One or more donors can be added through the template. Enter the Names(s) as you want them to be viewed by bidders on the bidding site. If multiple donors separate them by a comma. You can also enter in a Donor Display Name under each item on the manage items page and in the Items - Manage Donors tab. Y. Donor Address: Z. Donor Address 2 AA. Donor City AB. Donor State AC. Donor Zip AD. Donor Phone AE. Donor Cell AF. Donor Work AG. Donor Email AH. Donated Item AI. Donated Item FMV |