Keep your Classy and admin data consistent by sharing Classy ticketed guests within your software.
When you create a Classy Event Campaign, you can link that data automatically within your admin. When someone becomes a guest via the Classy Campaign, they will also automatically become a bidder in the Mobile Bidding event.
As bidders bid, win and pay for auction items and donations, data can be sent back to Classy easily because they were linked when they registered on the Classy Campaign.
If a bidder in your admin was not previously linked to Classy a new link can be created so that sales can be exported properly. This can happen if someone is not created via the Classy Campaign.
NOTE: Please wait until all of your Classy Contacts have updated contact information before Integrating or updating your existing bidder records in the admin not in Classy.
STEP 1: INTEGRATION
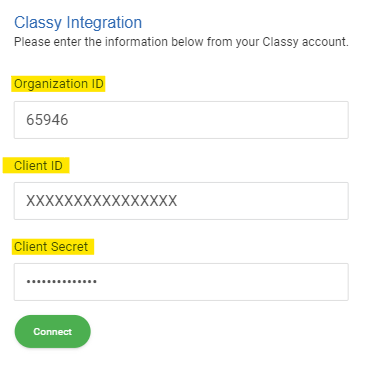
- Connect your account to Classy by logging into your admin. Navigate Integrations>Dashboard: click the green connect button on the Classy card.

- In Classy Manager, navigate to Apps + Extensions > Classy API and select "Create a New App"
- For the application name enter "ClickBid Integrations"
- For Oath2 Redirect URL, enter https://cbo.io/app/public/
*Note: “Some partner URLs may differ.”
- Click "Create API"
- Return to your admin and enter the Client ID and Secret generated in Classy Manager. Enter the Organization ID that appears in your URL bar when logged into Classy Manager.
Example: classy.org/admin/12345/apps/classy/api (12345 would be your Organization ID) - The below information can be found in your Classy account.
STEP 2: Select your Classy Campaign.
This lists all the campaigns in your Classy account. Make sure you are linking an Event campaign that is active.
STEP 3: Confirm Attendees are showing up within admin.
With the link established and the campaign selected, The integration will now check every 10 minutes to see if there are any new ticket purchases that need to be set up as bidders in your admin. There is no automatic alert sent to your bidders. 
-
If any bidders are created in the admin that did not come from Classy, they will appear on the Bidders page under Integrations>Bidders Not in Classy. From here they can be selected and sent back to Classy. This could happen if:
-
Any bidders that have self-registered on the landing page or are added by an admin
-
The ticket page is used to sell tickets and bidders are created from those ticket purchases.
-
- NOTE: The only information that integrates from Classy is Name, Phone Number, Email, and Attendee ID.
Export Bidders
This page lists bidders in your admin that are not linked to Classy. You can either add a Supporter ID and link them, or create new Supporters in Classy that are linked to your admin.
Export Sales
- Sales that are paid can be exported to Classy. They will be linked to the Classy Supporter listed in the table.
- After a bidder pays for a purchase, it will appear in Integrations for Classy > Export Sales page. Any sales here can be marked for export, either individually or by using the header box to select all, then click ‘Export to Classy’. The admin email address(es) on file within your admin will receive a notification when the export has been completed and the data has arrived in Classy.
- After the export has been completed, in Classy, this data will show up as an offline donation and can be found in the Reports > Transactions page - one record for each line item that was purchased (auction item, donation, raffle ticket, etc.).

- The upload into Classy shows the item name and number, it will not show what kind of item type the item is set to in your admin. The sale will be loaded into Classy as a donation.
- Text to give/online donations & Ticket sales can not be uploaded into Classy at this time.
- Once the export is done the purchase will no longer display under the Classy>Export Sales tab.
Data Mapping
Custom Data Mapping is located under Integrations > Classy > Data Mapping. Set up the custom questions in Classy, then you choose which field to add the information for Linked Attendees or Export Sales to Classy. 
The questions set up in Classy will not import any answers to ClickBid. The Data Mapping is only going to send info from ClickBid to Classy for the custom questions set in Classy.
FAQ
Are credit cards pulled over from Classy Ticket Purchasers into bidders?
No, only the First Name, Last Name, Phone number, & email if listed will be pulled into the Bidder information.
Can we integrate more than one Classy Campaign?
No, you should only use one campaign because the software is pulling from that campaign, meaning it's not Best practice to use more than one campaign the way Classy integration works.
Are Crowdfunding or Peer-to-Peer campaigns able to integrate their donors into bidders with the admin? The integration was built to support a 'Ticketed Event' and/or a 'Registration w/ Fundraising' campaign type. Other campaign types (Crowdfunding, Donations, Peer-to-Peer, etc), will not support the flow of donor data between our two tools. If an organization is looking to leverage Peer-to-Peer, Classy would encourage you to create the Registration w/ Fundraising campaign as that will allow for P2P fundraising after their registration.
If I update my contacts in Classy after they have been integrated into the admin, will they update?
The answer is no. Classy sends 1 record over to the software. This record is only sent from Classy 1 time and cannot be updated outside of the software. To update your Classy contacts, you can go to Bidders > Manage Bidders > update bidder records.
If I use a template to mass update my bidders, will this update my Classy contacts that were integrated?
No. Using the template to upload/update bidders will not update the existing contact, this will just create a duplicate bidder within the software.
How will information flow back into Classy if we register a new bidder?
You will have to go to Integrations > Classy > Bidders Not in Classy > To add bidders to Classy as supporters, check the box next to each bidder you want to as a supporter, then click 'Sent to Classy'.
How can we distinguish the admin-created offline transactions from other (non-admin) offline transactions?
As for distinguishing admin data, the offline payment description is the best way. It will always start with "ClickBid Export" followed by the item number and name.
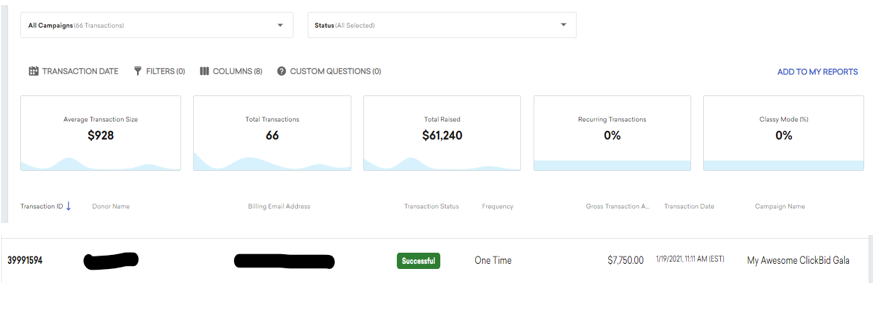
When we export the sales into Classy, what exactly will the transactions in Classy look like?
There will be a few different ways the view the transactions in Classy. Under Transaction History in Classy, you can see the transaction, donor name, billing email address, transition status, frequency, gross transaction amount, transaction date, and campaign name. You can also view the individual supporters under the Supporters tab. That will show you the Supporter ID, first and last name, email address, fundraising pages total raised, gross transaction amount, transaction last created, and created date.
How can we disconnect our admin from Classy?
To disconnect your admin from Classy, you can go to Integrations> Dashboard > locate the Classy card and click the blue Connected button. That will disconnect Classy from the integration. 
When disconnecting Classy from your admin, you will not lose any information that is already exported/imported into the admin. You will not have the opportunity to export new sales, and it will not pull in any new bidders. The classy tab will also go away within Connect to BidKit.
Error Message When Integrating:
This error message shown below means the Org ID, Client ID, and Client Secret was incorrect and the credentials could not be matched.

